


So I finished the new bike and took it out for its first ride today. It is pretty good. The lash on this wheel is significantly more than the silver one has. I have not yet tried to adjust the cone, and I know there's too much play in the bearings, so hopefully I can lessen the slop.
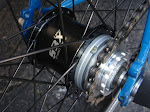
As you can see, I strung a long cable housing through the top tube loops, and clamped a cable stop to the seatstay. It looks a lot better than the pulley, and seems to shift fine. This was what I tried to do on the first bike, but it didn't work out because it kept slipping. This time I wrapped some cloth electrical tape around the stay and wrapped a piece around the cable stop, then clamped it all together. It holds well, and seems to be adequate. You can see the clamp and tape in the bottom picture. I also used a couple of cable ties to hold the housing in place.
The bike rides about the same as the Bianchi, but seems a bit bigger, which is good. I'm going to ride them both for a while, and decide which one I'll keep. I like the looks of the Centurion better than the Bianchi, and the fit seems as good. Now I'm thinking about switching things around again: silver stuff on the Centurion and black stuff on the Bianchi, if I decide to keep the Centurion. We'll see.
The Centurion now has a 50 ring/18 cog. When I rode today, it seemed like I was spinning too fast in the top gear. The Bianchi has a 50/16, which seems better. I think I'll try a 15 or 14 to see if I like being able to get some more speed on the flats and less RPMs on the downhills. It will require more frequent shifting. I'm only shifting 3-4 time per ride, other than for stop signs. The nice thing about this hub is that you can use cheap BMX cogs or even cogs from an old taken apart cassette to try out different gear ratios. Those fixie cogs are expensive.
You might be wondering what's inside. Well, not much, as it happens. The planet cage is all riveted together (probably a good idea since it never wears out and the compound planets can be wrecked if not reassembled by someone who knows how to "time" them). Now I understand how the S3X works properly.
ReplyDeleteHere's a very large picture of all the components, cleaned and ready for reassembly.
http://www.peeble.com/s3xparts.jpg
Weaknesses in the design - the axle key which locks the suns in "1" and "2" is very small and also wears its slot in the axle. Also, the indicator spindle has quite short threads which may cause it to strip out of the axle key; the cable tension is pretty high in "1". The old FW has even higher cable tension, but that used a two-piece indicator with much more thread engagement.
Because the planet cage and axle assemblies can't be stripped down further, I dipped them in gear oil and let them drain before reassembling with the special SA internal hub grease. Otherwise the grease might never penetrate to places like the planet pins. You use normal lithium bearing grease on the ball races.
RZ,
ReplyDeleteThanks for the picture and the skinny on the S3X guts. Hopefully those areas you find a bit sketchy won't rear up too soon.
I'd be interested to hear about your bike...
Vance
It's surprisingly similar to yours, although with the brake on the right and the shifter on the left 'cos we drive on the other side of the road.
ReplyDeletehttp://www.peeble.com/s31.jpg
http://www.peeble.com/s32.jpg
http://www.peeble.com/s33.jpg
http://www.peeble.com/s34.jpg
http://www.peeble.com/s35.jpg
http://www.peeble.com/s36.jpg
http://www.peeble.com/s37.jpg
http://www.peeble.com/s38.jpg
I put an extra 1mm spacer under the sprocket to stretch the chainline to 46mm. This means I can also use the "proper" fixed wheel, which is a Goldtec hub and an EAI sprocket.
I needed a longer RH axle nut because of the thin dropouts. This also allowed me to use a SA toggle chain protector, which is a good idea in case the bike falls over.
48 x 15 wasn't quite enough, and it's now running 52 x 15.
Thanks for the links to the pictures of your bike. It is a good looking ride. I prefer the pulley on the seat-tube as you have it set up to mine on the top tube. It is much cleaner.
ReplyDeleteIt's interesting that you say the levers are switched around because of the side of the road thing. Bikes here are set up with the front brake on the left. A lot of people with front brakes on their fixies switch the brake lever to the right. I assume this is because they're right handed. I left mine on the left because I did not wish to confuse the front/rear brake issue in my own mind. I'm also left handed. I've learned to do many things righty (tools, scissors, etc.), so I don't think that had anything to do with the decision to leave well enough alone.